
 |
| My daughters first scarf |
Knitting is one of those things that most people percieve to be difficult, but in reality it's not difficult at all. My grandmother started teaching me to knit when I was about 6 years old. And I have taught my daughter to knit and she completed her first scarf last year at the age of 10.
I began with things like knitting scarves for my dolls etc and it was all just plain straight knitting. However, once you master the basics, harder things will come quite easily. But first, the basics...
Now even with plain straight knitting, you can accomplish some pretty useful and good looking things. Hats, blankets, bags to name a few, but since it's winter, we're going to start with a scarf that will be cheap, warm, look good and most importantly, you'll be able to brag about it because you made it YOURSELF!
If you've never knitted before, fear not about how slow you are in the beginning. This simple knitting project will help you to achieve your scarf in a short amount of time because we will be using chunky yarn and fat needles. This means that you will need fewer stitches, and every row you knit will increase the length of your scarf by at least 1cm.
As I've mentioned before, bargain shops are a great source of some very cheap, but very cool things and for this project, it will be no different. Stores like Reject Shop, Aldi, Golo and Chicken feed keep a pretty good variety of pretty yarns in the colder months that are ideal for your scarf. However, if you don't mind spending a little more money, Spotlight also has great yarns in a huge variety of colours and textures that will make a beautiful looking scarf.

You should look to get very chunky yarn that has lots of texture. Also something soft and comfortable that will not irritate the skin on your neck. Next, knitting needles. Get needles that are at least 8mm in diameter, I prefer 10mm.
SUPPLIES
~ 3 x balls of yarn (depending on how big the ball is and how long you want your scarf to be. 3 balls will give you and average length scarf that sits at your hips).
~ 1 pair knitting needles size 10mm.
GETTING STARTED - Casting on
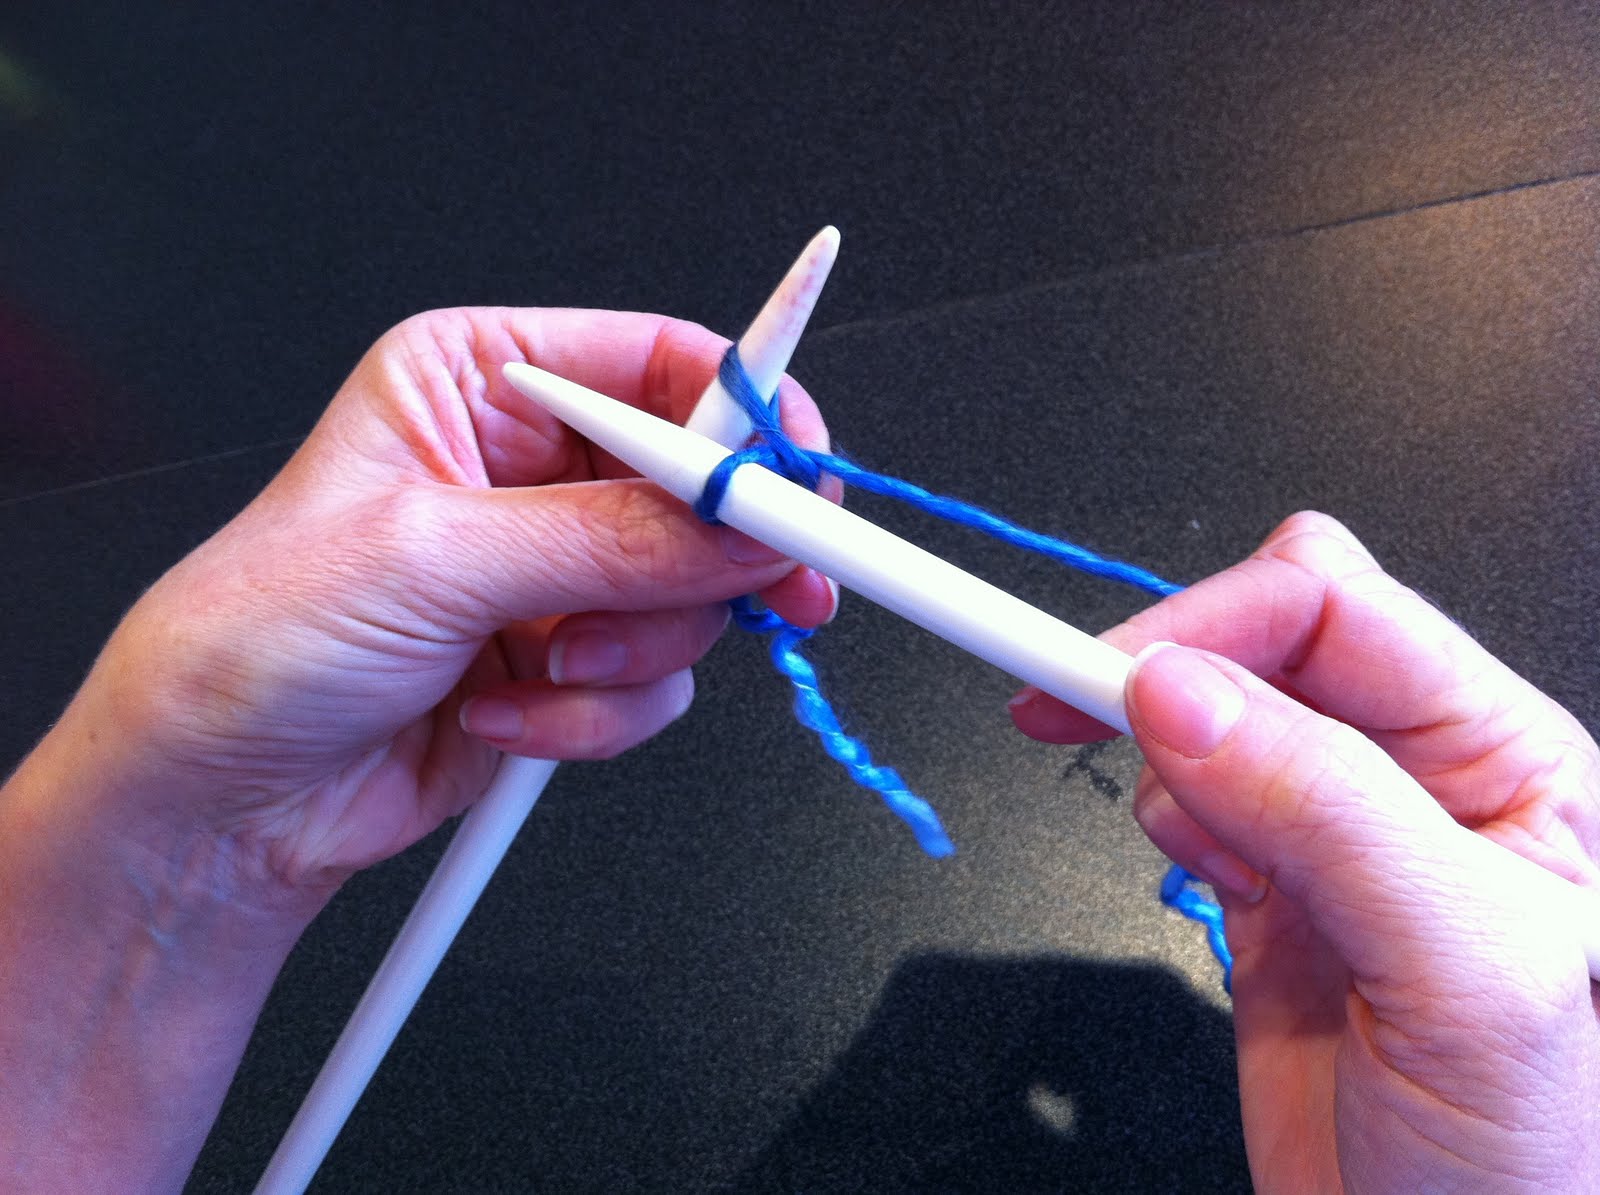
1. Cast on 10-15 stitches. This will depend on how wide you want it to be, but 15 will be average. 10 will give you a slightly thinner scarf. You cast on like this: Take the end of your yarn and make a slip knot with a tail of about 2 - 3 inches. Slipthe loop over the end of one of your needles like this:

2. Next insert your needle into the "stitch" from the left so that needles make a cross with the right needle behind the left needle, like this:

3. Wrap yarn around the right needle. This will start to create a new loop. Then ease the right needle down out of the loop it was through and push forward:

4. This loop will now become a new stitch by placing the loop on your right needle onto the left needle, like this:

5. Once you have placed the new loop onto the needle, you need to cast on another stitch. This time however, when you insert your needle to create the new stitch, place your needle BETWEEN the 2 loops, rather than inside the loop like before. This will make your edge neater upon completion.

Then wrap yarn around right hand needle as before, and then placing the new loop on the left needle again. By now you will have 3 stitches on your left needle. Continue on this way until you have the desired amount of stitches on your needle.
6. Now that you have cast on the amount of stitches you need (in my photos I have 16), you can now begin knitting. Insert your needle into the first stitch the same way you did when casting on your first stitch through the left side of the first stitch and crossing them right under left:

7. Wrap yarn around needle (as before) and easing needle down and then forward, only this time instead of putting the loop on your RIGHT needle back onto your LEFT NEEDLE, you will keep it on your right needle, and slip the stitch that you have been knitting into OFF your LEFT needle:


In this way you are essentially replacing the stitches from the LEFT needle with stitches onto the RIGHT needle. Continue on through all stitches on the left needle.


You have now completed your first "row" and it should look something like this above.
8. Now start your next row. Count your stitches to make sure you still have the same number as when you started. Beginners should practice doing this when they are just learning to make sure that they have not lost any stitches along the way, or gained any! As this will affect how your work looks at the end.
Switch your needles over and put the full needle back into your left hand, and start as before. Make sure that your yarn is hanging down like this:

This picture is WRONG:

After you have completed your second row, your work should have come along nicely already and will probably look like this:

9. As you can see, chunky yarn and chunky needles results in your work growing very rapidly. This picture shows how it looks after just 2 rows of knitting. Continue every row the same as the previous one until your scarf is as long as you wish it to be, or you can see that you are soon to run out of your yarn supply.
10. To finish off (cast off) is so simple, you won't even need photos.
You begin casting off at the start of your last row. You knit 2 stitches like normal, and then when you have the 2 stitches on your RIGHT needle, you take the point of your LEFT needle and lift the stitch behind the front stitch and lift it over the top of the front stitch and drop it off the end. You then knit one more stitch so that you have 2 on your RIGHT needle again, and repeat by lifting the stitch behind over the front stitch and drop it off. Just keep repeating until you are left with just one stitch on your right hand needle.
11. Cut off your yarn (if necessary) a couple of inches down, hold onto your last loop so as not to drop it, then pull the needle out. Put the cut end of your yarn through the loop and pull tight.
CONGRATULATIONS, you have now completed your scarf! You can now add tassles if you like, or, if you wish to keep the ends plain, just take a darning needle and tidy up your work by threading the beginning and ending threads back through your work to disguise them and give you a neat edge on both ends.
If you're feeling extra creative, you can also add felt cutout shapes to decorate, flowers, beads or whatever your imagination can think of. This looks especially cute for kids.
*TIP: When putting your knitting away for the day, or for the time being, always put it down at the END of a row, not in the middle. When you return to your work, this will help you to avoid confusing which way you were knitting when you put it down (especially helpful for beginners). Also push your knitting down to the bottom of the needle to ensure no stitches are dropped before you come back to it.
It may also be a good idea to keep it away from children, dogs and cats who may find unravelling your beautiful knitting quite amusing....
Happy Knitting! AND after you've completed your masterpiece, please come brag about it by posting a photo of it on my Facebook page.
No comments:
Post a Comment